MIDI Designer Reference Manual
Sidebar
Table of Contents
Chapter 20: MD A to Z
MIDI Designer A to Z
Alphabetical list of MD functions, capability, and related topics.
Work in Progress - starting with recent functionality adds not otherwise described in manual and recent help desk questions.
Ableton Link
added in 2.300
Ableton Link synchronizes beat, tempo, and start/stop in music apps. Available in Ableton plus other apps. Link capability varies by device.
Link is a technology that keeps devices in time over a local network, so you can forget the hassle of setting up and focus on playing music. Link is now part of Live, and also comes as a built-in feature of other software and hardware for music making. ableton.com/en/link
MD syncs Beat, Tempo, and Start/Stop.
Ableton Link provides the beat & tempo for MD Loopers.
Ableton Link is configured in MORE / Connections / Ableton Link. This brings up a menu with the Link settings.
When enabled, a pop-up will appear when devices join and leave the Link.

Supporting Ableton Link are three control subtypes:
- Link Start / Stop (toggle button)
- Link Tempo (knob - 1-4, 4 ticks)
- Link Beat (knob - 40-360, 321 ticks)
For a sequential beat display, create four buttons (no MIDI Send / Receive) and make them subcontrols of the beat knob then hide the beat knob
Link Beat knob can be used to drive other desired action in MDP2 via subcontrol relationships, controllable via the Play and Tempo controls, such as continuous panning LFOs, etc. MD will generate beat if no Link device is connected.
Continuous Controls
Continuous (or variable) controls send a value from a range of MIDI values from MIN to MAX, as set in the control's MIDI Properties panel or in the NAMED TICKS values. The NAMED TICKS option can provide non-continuous, arbitrary order, and repeated MIDI values, as desired. Compare to discrete controls (button only), which can send only one (on only) or two (on/off) different values.
Continuous controls:
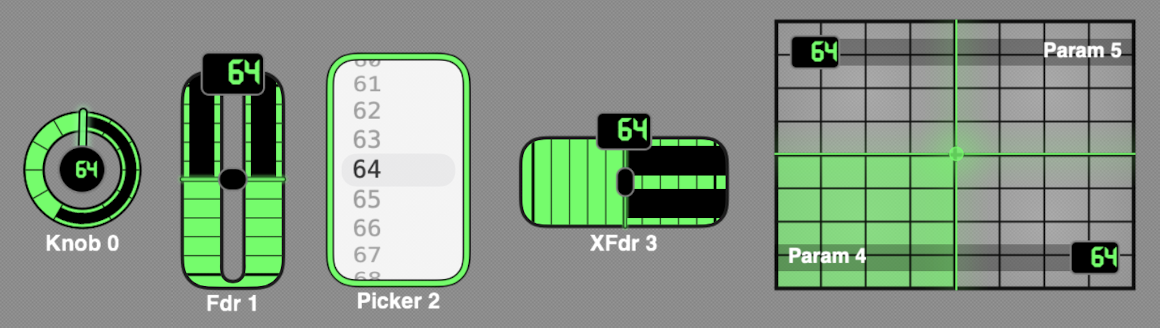
The continuous control types provide different panel interfaces for the same MIDI control backend.
Continuous control types and key features:
| Type | Action | Displays | MIDI Properties |
|---|---|---|---|
| Knob | Up/Down * or Rotary | Single number &/or Named Ticks text # | All |
| Fader | Up/Down * | Number &/or Named Ticks text # | All |
| Cross Fader | Left/Right * | Single number &/or Named Ticks text # | All |
| X/Y | Left/Right & Up/Down + | Single number &/or Named Ticks text for each axis # | All |
| Picker | Up/Down, spin with momentum | Multiple lines of Numbers &/or Named Ticks text | All - Send On Release always active |
| * Rotate Touch Axis & Inverted options |
| + Inverted options |
| Rotate Touch Axis turns control action 90 degrees |
| Inverted changes control axis 180 degrees |
| Rotary requires a rotary sweeping motion to activate |
| # display options include handle, fill, ticks, display zero, numeric label, as applicable |
Custom LED Color
New in 10.3.0
All controls have complete flexibility in color and opacity. You can select a custom LED color for the Page and for each individual control.
Tap on Custom LED Color, then tap the circle under LED Color to bring up the color pickers.
Select color - iPad
- Grid (predefined colors)
- Spectrum
- Sliders (RGB or Hex)
- Up to 10 favorite saved colors (bottom of palette), + adds current color, press and hold to delete
- Eyedropper (top of palette) brings up a loupe to select an existing screen color
- Opacity (100 to 0%) - bottom of palette
- Tap for last LED color - applies last color selected

Select color - Mac
LED Color will bring up the system color pickers, with all operating system options.
- Example pickers shown below
- Several pickers have a drop down with further color selection options
- Eyedropper (at bottom left) brings up a loupe to select an existing screen color
- 20 saved favorite colors at bottom. Select color and drag from square left of eyedropper to an empty spot
- You can define and load custom palettes.
Tap for last color is also available.
Enable / Disable Control
New in 2.3300
Option in the Relationships pane. This provides for dynamic enable & disable of MIDI transmission and subcontrol response from the control.
When a button is selected for Enable/Disable, and that button is off:
- The control will not transmit MIDI
- The control will not affect values of subcontrols
When the button is on or there is no selection in this option, MIDI transmission and subcontrol response occurs.
The two controls have to be on the same page to select - the controls can be moved after selection.

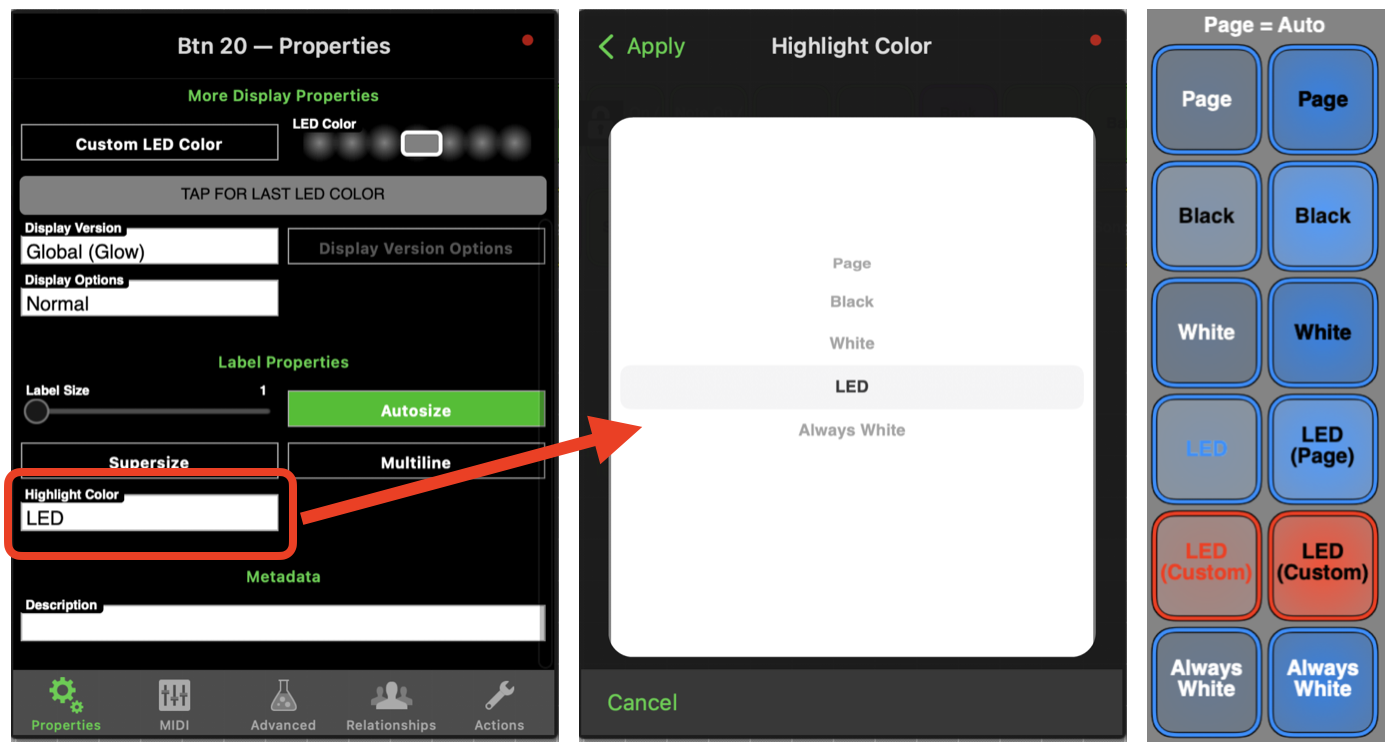
Highlight Color
New in 10.3.0
Highlight color (i.e., text color) is now selectable for individual controls. Options are:
- Page
- Black
- White
- LED (Page LED if custom LED not selected)
- Always White (for button controls)
Note: selecting Black Page color may override individual control selections
Label Value Source
Added in 2.175
Make labels dynamic - show values from knobs, buttons and other controls. Show the name of a selected preset, change labels based on control settings - many uses to enhance your layout.
- Available for Labels only.
- Any control can be selected as the value source - but it must have “text” data to send. Text data is:
- Button - label when on, blank text when off
- Knob, slider, x-y pad - named-ticks text
- You can name the label, but the name will be replaced by the value source on first operation.
- In Design Mode, labels with value source set but no current value will appear as green blocks.
- The source has to be on the same page to select - the controls can be moved after selection.

Learn (MIDI)
MIDI Learn button appears on control MIDI settings page.
MIDI Learn functionality by control type
| Control Type | “Learned” |
|---|---|
| Cc | Channel and Cc # |
| Note On / Off | Channel and Note # |
| Note On / On | Channel and Note # |
| NRPN | Channel and NRPN # |
| NRPN 16K | Channel and NRPN # |
| Bank / Prog | learn non functional * |
| Bank | Channel |
| Program Change | Channel |
| Pitch | learn non functional * |
| SysEx | SysEx Verbatim |
* only valid value to learn would be channel
Notes:
- Learn does not learn message type - correct message type must be selected to learn information shown in table above for that type.
- Learn does NOT learn MIDI min / max values - it is learning the message channel and message or note number.
- Learn will capture a SysEx message verbatim. It cannot determine which bytes represent channels, values or checksum. The leading F0 & trailing F7 are not shown in the MIDI message properties.
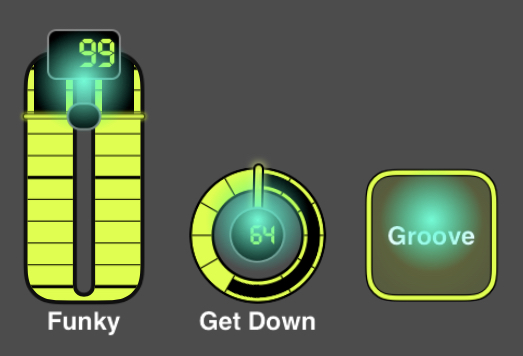
Loopers
added in 2.300
Control Loopers – look-ahead, tempo-locked loopers with mute, reloop, and adjustable length.
When Ableton Link is running, MD is always capturing control actions, and on pressing the loop button, control actions during the selected number of prior beats is captured and looped.
Loopers bring one new control subtype - Link Looper - and three new relationships, selected in the Link Looper control properties page:
- Mute Button - mutes loop control action
- Reloop Button - when active, loop playback can be captured in new loops
- Length Knob - number of beats to capture (1-64)
Note - these controls should typically be set to No MIDI Send / Receive

![]()
Notes
- The loop captures all control actions performed in MD, except Ableton Link and Looper controls.
- Inbound MIDI is not captured for loop. The inbound midi has to effect a control action in MDP2 - that control action is captured. On play, that control will not transmit midi, but can drive subcontrols.
- Loop length in beats is selected in Advanced property tab, from 1 to 64.
- If a knob is selected in Length Knob for Looper, the knob takes precedence and the length setting is not available
- Length is not dynamic - loop length is fixed by knob value when Loop is captured
- When a Loop control button is toggled ON, the prior N beats of control actions are captured. A temporary pop-up shows the number of beats, events, affected controls captured.
- When the Link Looper button is toggle OFF, loop data is cleared. The mute button silences the loop while keeping the data.
- When a Link Looper's reloop button is enabled, that loop data will be will be included in the next loop captured. On capture, the relooped track is immediately muted.
- When the Link Looper is set as Label Value Source, it will add Beats / Events / Controls counts after the control name when active.
- If you capture note controls in MD, but have not released all before you capture, you will have a hung note. The same can happen muting in the middle of the loop. You can deliberately do this to create a drone - just gotta manually turn off.
- Toggling the Ableton Link Start / Stop control does not clear current loops
- Loop data is not saved with the layout
- A control can be in multiple loops - this can make some interesting control mashups.
 When a loop has captured data, the looping controls are highlighted - color matches color of the Link Looper control. If the control is in multiple loops, only the most recent color appears.
Related QA topic with sample Looper page

Make Screenshots
New in 10.3.0
Found under Config / Options

Creates all the available permutations of screenshots.
For a layout with numerous pages, can take some time - a max layout with 48 pages, 2 at a time, generates 2256 screen shots.
To stop the shots before ending, shift to another window (iPad) or close the app (Mac).
Screenshots are saved to:
- Mac - Sandbox folder. Use File / Open App Sandbox in Finder (or ⌘ + 6) to open the Sandbox.
- iPad - MIDIDesigner Folder. Access with the Files 📁 App.
The file names indicate left and right bank and page, as follows: bank-1-page-1-bank-2-page-5.jpg
To preclude filename chaos, file or delete screenshots from one layout before working on another. Identical filenames will be overwritten without prompt.
MORE Button

MORE button is used to access MIDI Designer menus on:
- iPad - all menu actions
- Mac - Most menu actions except some File actions
Tap an empty area of the screen to hide the MORE menu
iPad
Since Apple introduced multitasking, MD has attempted to maintain a non-aggression pact between our MORE button and the iPad … multi-tasking menu. Our challenge is that the … doesn't stay fixed, it wanders depending on zoom level, split, slide-over, and Stage Manager arrangement. We have tried other implementations, even dispensing with the MORE button, but we returned to MORE as the most approachable option.
If … is not behind MORE, you can directly press MORE
If … is behind MORE
- In PLAY mode, tap any blank area on the screen and MORE will drop down *
- In Full Screen, swipe down from screen top (both Design and Play)
- If visible, tap 🔍 to change zoom and see if … and MORE separate far enough
- In Slide Over, Split Screen, or Stage Manager, tap the hand (🤚) and reposition the window until … is no longer behind MORE
- Some users report success aiming their tap at the bottom of the MORE button
- For PLAY mode, add a MORE button to your layout
* MORE drop down can be disabled in options
Negative MIDI Values
Unfortunately, there is no standard definition for negative values in MIDI spec, so each manufacturer does their own thing(s).
Examples are
- using one Cc 0-127 for positive values, a second Cc 0-127 for negative values
- Setting 0 at 64, 65 and up are positive, 63 and down are negative
With SysEx, it gets even hairier
Roland may set 0 at 08 00 00 00, so 08 00 00 01 is 1, 07 7F 7F 7F is minus one, etc. Or sometimes they set 0 at 04 00 00 00. Or maybe completely arbitrary, such as 0 = -Inf, 1 = -53, 2 = -51.7, 3 = -50.4, etc.
For simple cases, such as zero at 64, you can set display min and max as appropriate for the negative values.
Search for “negative” in the forums and you will see some prior discussions.
For more complicated cases, Named Ticks are the solution. Easiest to build in a spreadsheet, then paste into the Named Ticks text field.
- Determine the format used in your target device
- Build the format in a spreadsheet
- Copy format results to Named Ticks
For example, presume a two byte SysEx, 0 is at 00 00, 1 is 00 01, -1 is 7F 7F, etc. We can build the table as follows:
| Value | MSB | LSB | 128*MSB+LSB # | Load this Column in Named Ticks |
|---|---|---|---|---|
| … | ||||
| -2 | 7F | 7E | 16382 | 16382 \ -2 |
| -1 | 7F | 7F | 16383 | 16383 \ -1 |
| 0 | 00 | 00 | 0 | 0 \ 0 |
| 1 | 00 | 01 | 1 | 1 \ 1 |
| 2 | 00 | 02 | 2 | 2 \ 2 |
| … |
# Hex2Dec(MSB) * 128 + Hex2Dec(LSB), or use decimal in MSB, LSB columns (7F = 127, etc)
While the SysEx definition field uses Hex, the named ticks values are decimal.
Note - this example puts the display value in the text position (and we just skip the display value). This is necessary if your negative values exceed -99, the negative limit for displayed value.
Why does not MD have options for the negative values? Frankly there are too many possible formats, even within a single manufacturer, and you do have a generic approach with Named Ticks.
No MIDI Send / Receive
Added in 2.300
MIDI Message option that turns off MIDI functionality on a control.
Useful on controls being used in Relationships - Other to preclude unneeded MIDI messages.
Previously you had to assign these controls to a message type that would not cause undesired effects or block with outbound StreamByter rules.
Page Sizes
In the beginning, there was a single iPad page size, and all layouts were the same size.
We now have a wide variety of page sizes, and a layout's aspect ratio may not match the current device. In this case, you have two icons at the bottom right of the display.

- magnifying glass - zooms in to full width, or out to show full layout
- hand - when highlighted and zoomed-in, repositions layout view
There is capability to disable these icons when the aspect ratio does not match.
These icons not shown on a Mac. The layout is always shown full width. Use your trackpad or mouse to zoom layout view.
New layouts will start in a device's native capability. Mac layouts will be a maximum size. For more universal compatibility you can start with a smaller device layout size. This is not currently a menu option - see Q&A forum where some smaller blank layouts are posted.
You can resize an existing layout to a devices native size - More / Config / Change Layout Size. Choosing TALL (i.e., portrait) with a layout designed in WIDE (landscape) can have adverse impact on control positioning.
Picker
The control type PICKER was introduced in MD 2.0 as part of the Extra Features Pack. In MD Pro-X, it is always included (as are all the legacy in-app purchases)
A simple numeric-only picker: 
The PICKER adds a flexible text display to the existing continuous controls. The continuous control types provide different panel interfaces for the same MIDI control backend.
Continuous controls can send a value from a range of MIDI values (min to max)
Button controls can only send a one (on) or two (on/off) discrete values
MIDI Properties
- The MIDI Properties for a PICKER are the same as the other continuous controls, with one exception - PICKERS are always “SEND ON RELEASE ONLY.”
- PICKERS do show an option for ROTATE TOUCH AXIS - this has no effect - PICKERS always respond to up/down motion.
Examples of some PICKERS uses:
- With NAMED TICKS, provide text labels for different control settings, vs simple numeric values
- With NAMED TICKS, set to type PRESETS, facilitate storing, recalling, and selecting from a large list of patches
- With NAMED TICKS, and using SysEX strings, load device patch names for display and control
A picker for drum machine preset patterns:
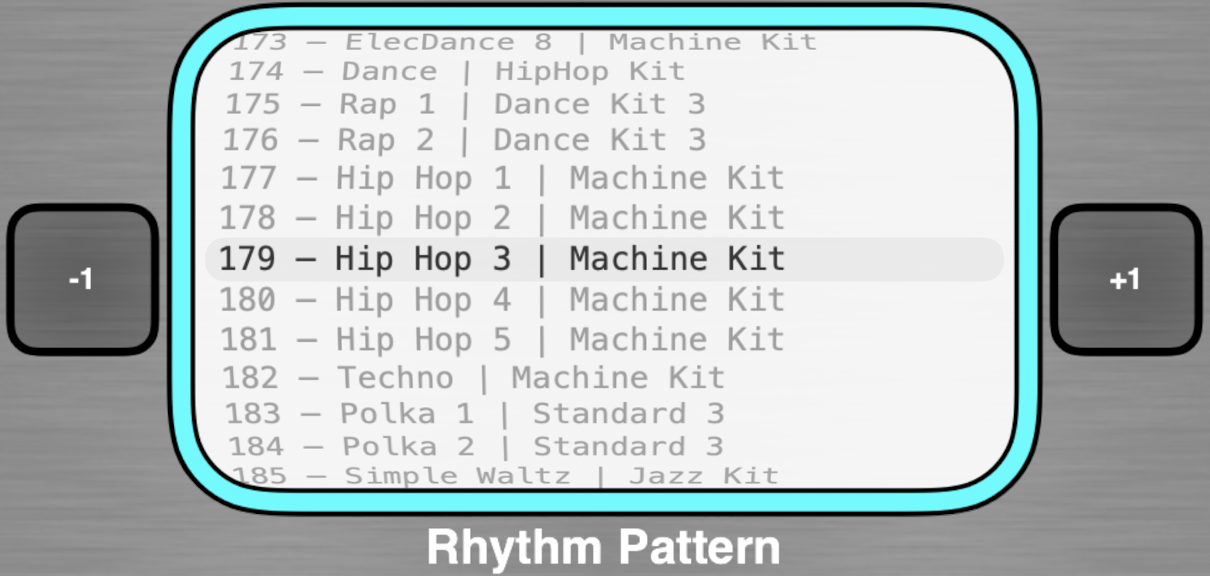
PICKERS can present any text information. In the RD2000 example below, we see the tone source and number, category, and name. In this advanced example:
- The top buttons select tone groups (matching the RD front panel buttons)
- The middle picker can further refine the tone group,
- Then the bottom picker narrows in to one specific tone.
- The +1 & -1 buttons facilitate moving by one category or tone.
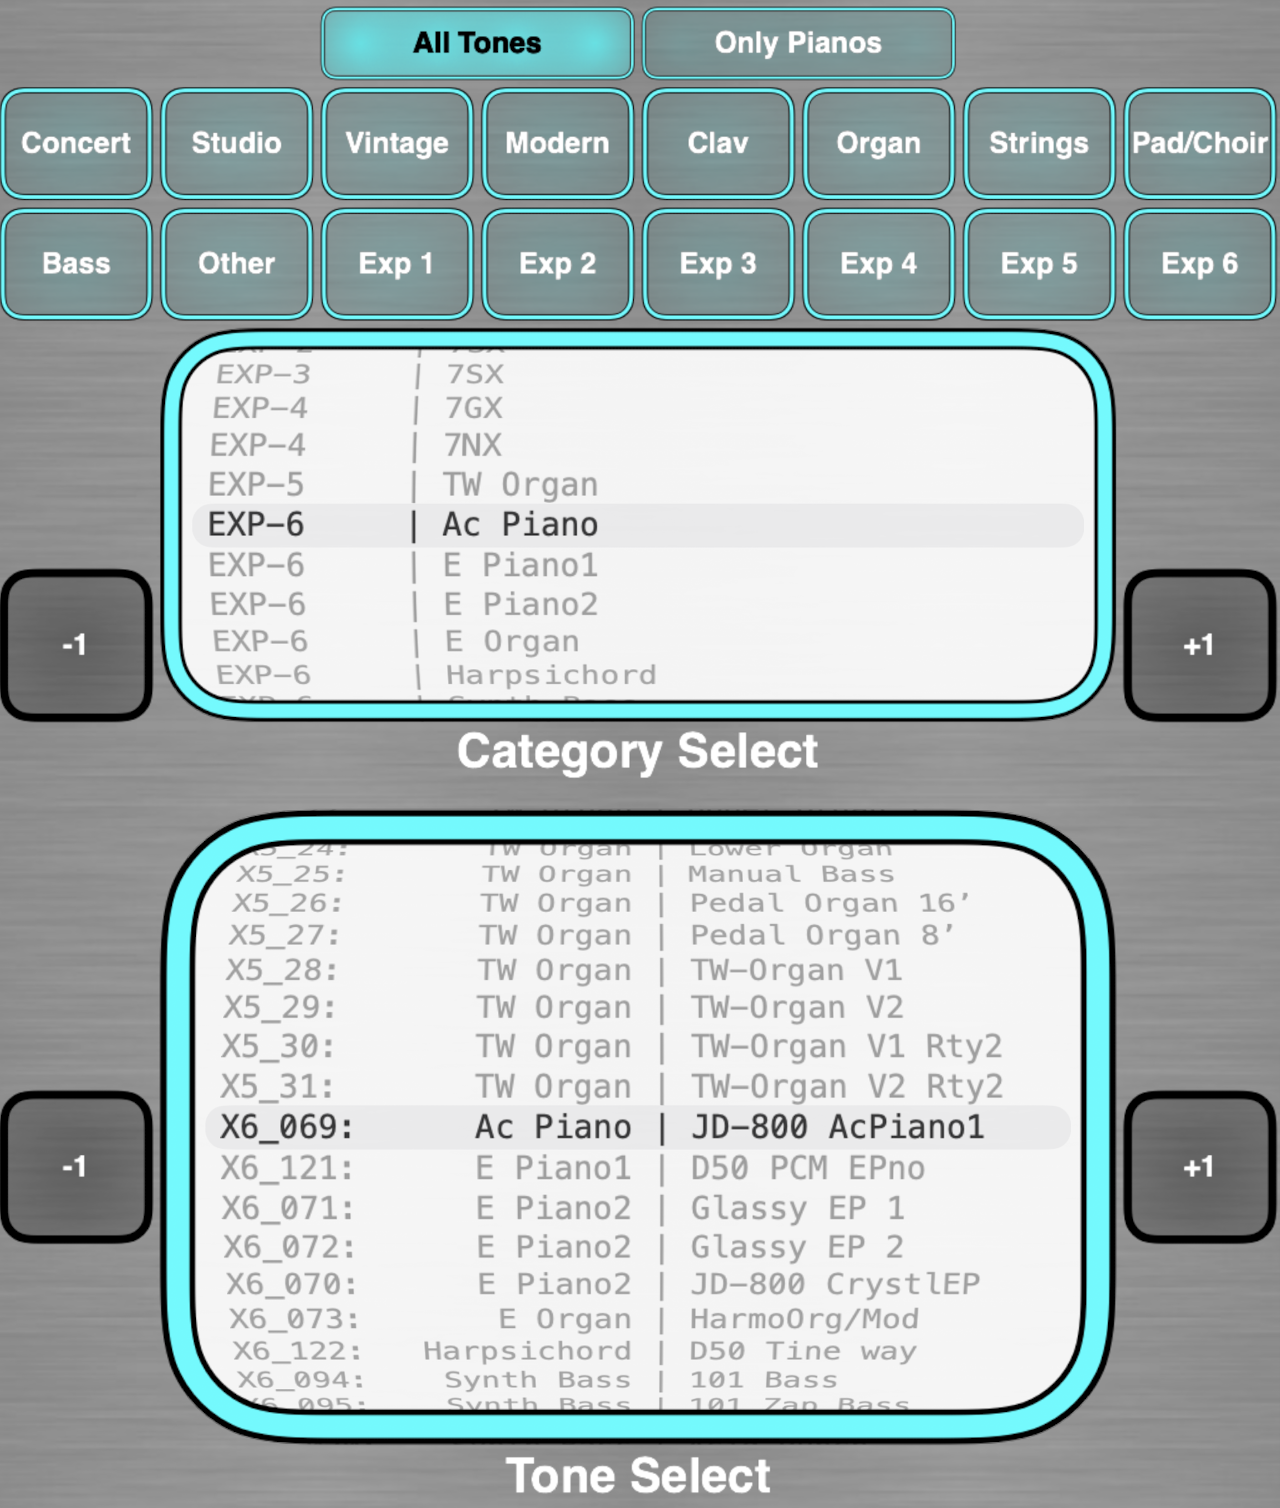
Text formatting in PICKERS:
- Complicated or lengthy input to the NAMED TICKS supporting the PICKER is best prepared in a spreadsheet then copied to MD.
- Leading spaces, including no-break-spaces, are not respected
- In other locations, use no-break-space to preserve white space - option (⌥) + space
- The numeric value can be displayed by the picker, or hidden and replaced with next numerics (see the RD example above). If the picker goes above 999, the maximum MD numeric display, then the numeric display must be handled in the text.
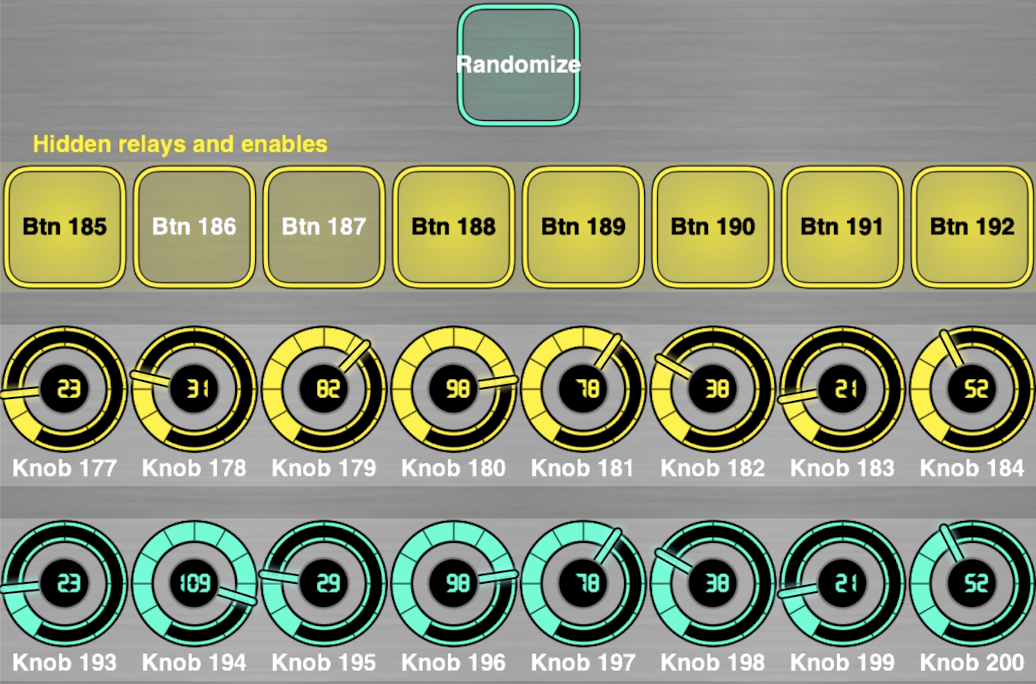
Randomize
New in 2.3300
Randomize Subcontrol: have any subcontrol switch to a random value on button press
A new selection in the Options as Super panel. When the supercontrol is activated, all subcontrols are sent to a random position within the control range.
Randomize works best as a momentary button, but can be enabled on most type controls.
Randomize on a knob will send a large number of random values as the control is moved above 64. Below 64 it has no impact.

Multi-level randomize example - the main button randomizes an array of supercontrol knobs and their enable / disable buttons - randomizing which of the subcontrols that get randomized.
Relationships - Other
Modifying one control behavior with a second, not super/sub relationship. These provide the additional building blocks to implement complex relationships. These relationships are dynamic - they can change during PLAY - a control is selected that will dynamically enable / disable the behavior. In most cases, the implementing control is a button. The one exception is the knob used for LOOPER length.
| Option | Action | Notes |
|---|---|---|
| A / B Control | Send values to a second sets of identical controls | A-B exchange activated in CONFIG / MIDI |
| Button Off Sets to Default | Returns controls to default value when button goes off | |
| Enable / Disable (transmit) | Turns on and off control transmit | Affects both MIDI transmit and subcontrol change |
| Enable / Disable Receive | Turns on & off MIDI receive | If a selection is made in this box, the MIDI Receive option on the MIDI page will not be visible |
| Extra CC and Hold | When touching a continuous control, activates the toggle button - the extra Cc | Continuous controls only, except Pickers - in Picker properties, but does not function |
| Label Value Source | Dynamically change label text | Labels only |
| Latch (Make Toggle) | Dynamically change a momentary button to toggle | Momentary buttons only |
| Looper controls | Mute, Reloop, and Length looper control | Target control must be LOOPER |
| Recall Preset | Recalls a preset | Momentary or toggle |
| Show / Hide (Panels) | Dynamically show / hide panels | |
| Store Preset | Stores a preset | Momentary or toggle |
Notes
- Controls need to be on the same page to configure the relationship. They can be moved after configuration.
- If the buttons implementing these relationships do not need to either transmit or receive MIDI, select No MIDI Send / Receive.
- We could arguably include PEDALBOARDs in this list. PEDALBOARDS can be a hybrid - super/sub relationships, when the option to impact only current page subcontrols you have dynamic switching that knows which pages are visible.
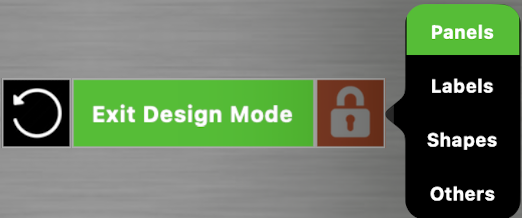
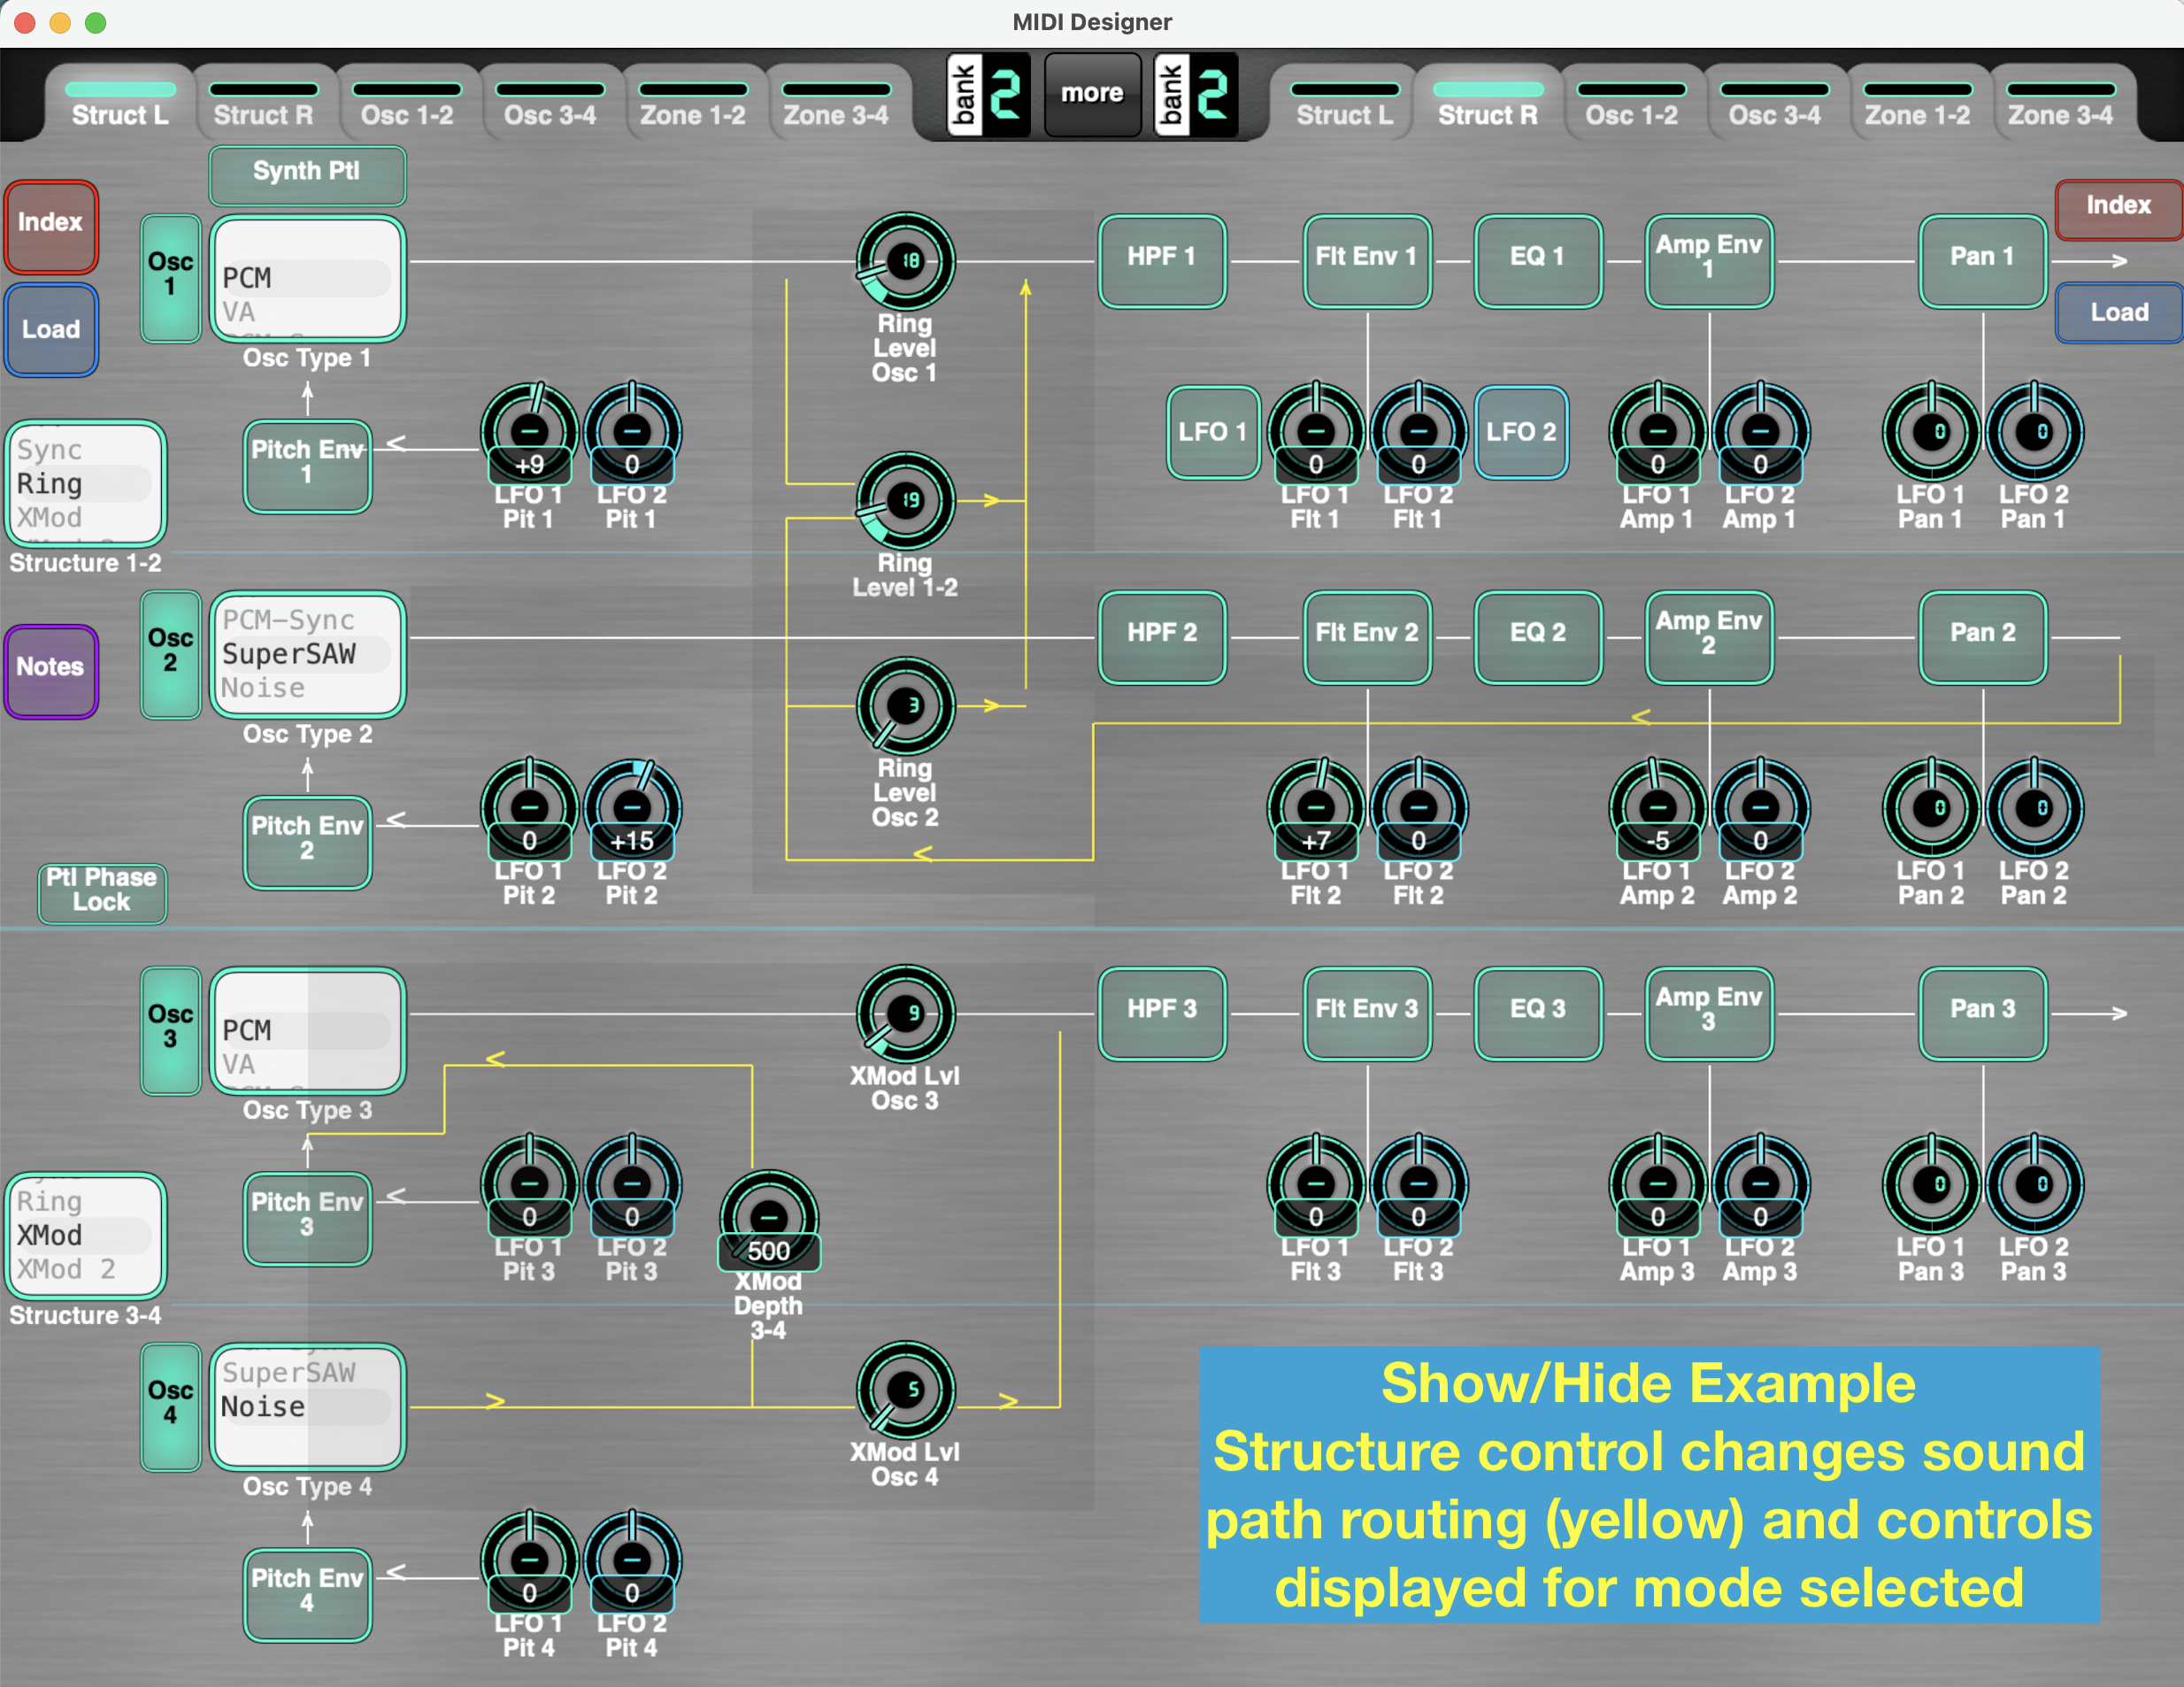
Show / Hide Panels
Added in 2.150
Dynamically show or Hide a panel. Group a set of controls and labels on a panel, then choose when they are displayed.
Example uses;
- Display sound engine routing based on mode - synch, ring, mod, cross mod, etc.
- Change control display to match selected effect
- Increase layout capacity by stacking multiple controls sets on single page
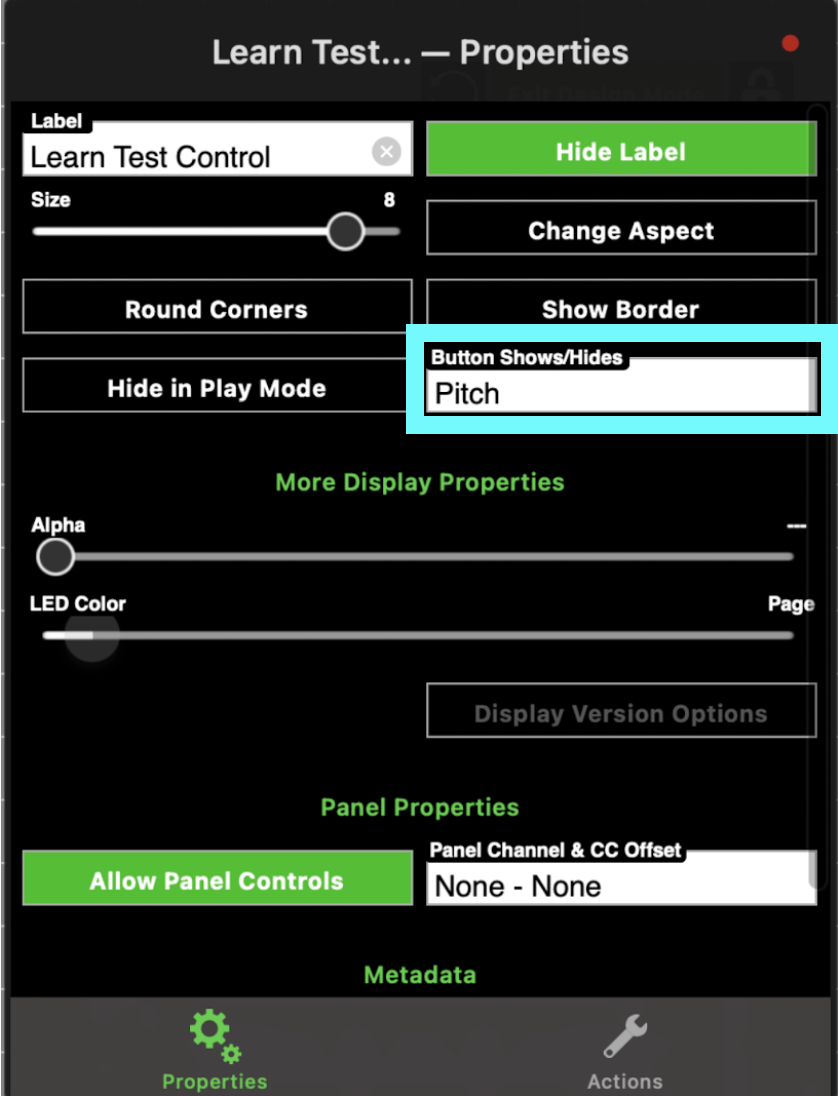
The controls must be on the same page to select, but can then be moved
Tips to working with stacked panels:
- Resist the urge to edit anything in the panel stack, it will end up on a wrong panel
- Keep enough blank pages to unstack panels
- To edit - unstack all the panels

- Lock everything except panels
- Unstack each panel onto an unused page
- Unlock everything except panels while editing
- Finished editing - restack the panels

- Lock everything except panels
- On each panel, toggle “allow panel controls” - ensures all controls are captured on the panel
- Restack the panels

To implement complex show / hide, consider an array of knobs with named ticks defining when panels show and hide, driving the individual panel Show / Hide buttons
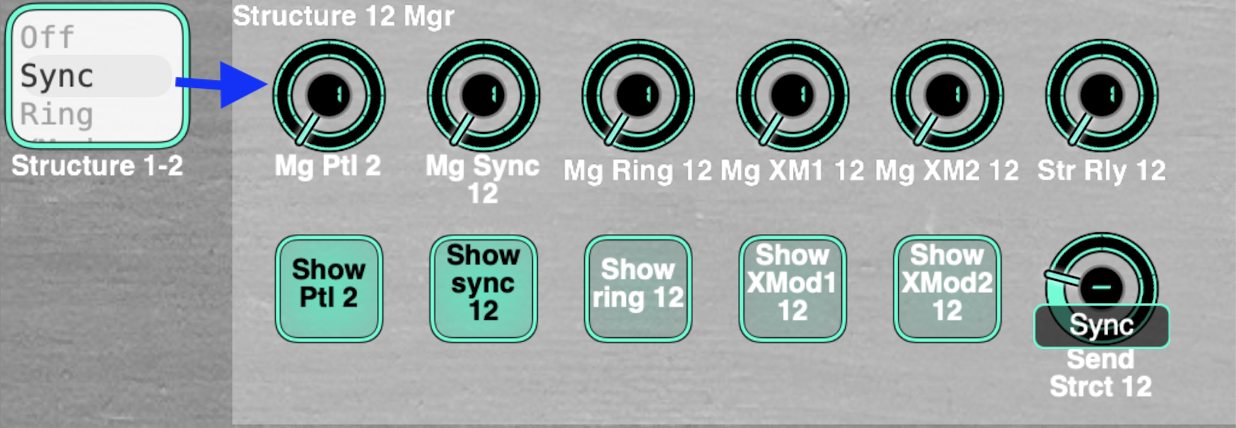
Examples:
Jupiter X(m) ZEN-Core Editor - sound chain dynamically updates based on oscillator mode
Jupiter X(m) Manager - menus change based on effects selected, show effects in sound functional flow, show global or scene controls settings, etc.
SysEx Strings
Added in 10.5.0
A new variable “S” (for String) in System Exclusive (SysEx) format to receive or transmit string data (patch, program, tone, etc., names). S works alongside the current L and V variables in the SysEx message definition.
To support this addition, the SysEx architecture was updated, which should correct the legacy occasions where some combinations of L and V did not function properly.
A new Relationship - Other is added - Enable / Disable Receive Button. This provides for dynamic control of when the SysEx string data can be updated. It is also generally useful for switching MIDI Receive for any control.
Usage
- SysEx strings work in conjunction with Named Ticks - which is where the string data is stored. This includes knobs, pickers, faders, cross faders. Buttons do NOT implement Named Ticks
- To store string data, SysEx definition must include V - this specifies which specific Named Tick value receives the string data.
- String data can be transmitted from Named Ticks without defined V.
- S values can be be from 20h to 7Eh (32 to 126 decimal) - original ASCII Display values.
- If the stored string is shorter than defined length, it is padded with spaces (20h)
- If the stored string is longer than defined length, it is truncated
- S length can be specified from 1 to 32
- When an inbound SysEx message matches the control SysEx template (including L when used*), and the enable / disable receive button is on (if specified) then the string value is extracted and stored in the named tick that matches V
- A new entry in Relationships panel provides for an (optional) control to enable / disable storing the string values. This provides for dynamic control of MIDI reception.
- When the control is changed, the string value is transmitted with the defined SysEx format (unless specified as a supercontrol, in which case the MIDI values implement the standard super-sub relationship)
- An updated SysEx Properties panel provides for selecting
- V bytes (1-4)
- V Leading LSB option
- L* (if L is specified and a channel changer control is not connected)
- S(tring) bytes 1-32
* Note - L is also known as Channel, and is controlled by a Channel Changer control. In SysEx format it does not control channel, but is an extra variable, not limited to 0-15, but can have values from 0-7F.

Note - Channel appearing as an option in the variables pane indicates there is no channel changer supercontrol connected.
As of beta 5-24
- S can be specified in a button control, but it has no impact. It does not receive and store a value, and it will always send spaces for the string data
- Make Similar of a SysEx string control does not preserve the length
- You cannot edit string data in play mode. To send revised string data to the device
- enter Design Mode,
- edit the desired Named Tick data,
- exit Design Mode,
- then select the changed value to send the string.
- Beta tests to do
- test if the match is greedy or exact – done - is exact!
- What value is transmitted if invalid value is preexisting in Named Ticks
- Follow typical variable control closest match if not exact?
Retrieving and storing patch names
A few “helper” controls will be required to command the target device to transmit the strings for storage. In this example, we see the Enable / Disable Receive button on the left, a “Query” button in the middle, and a “scanner” on the right - the “scanner” can be hidden in play mode.
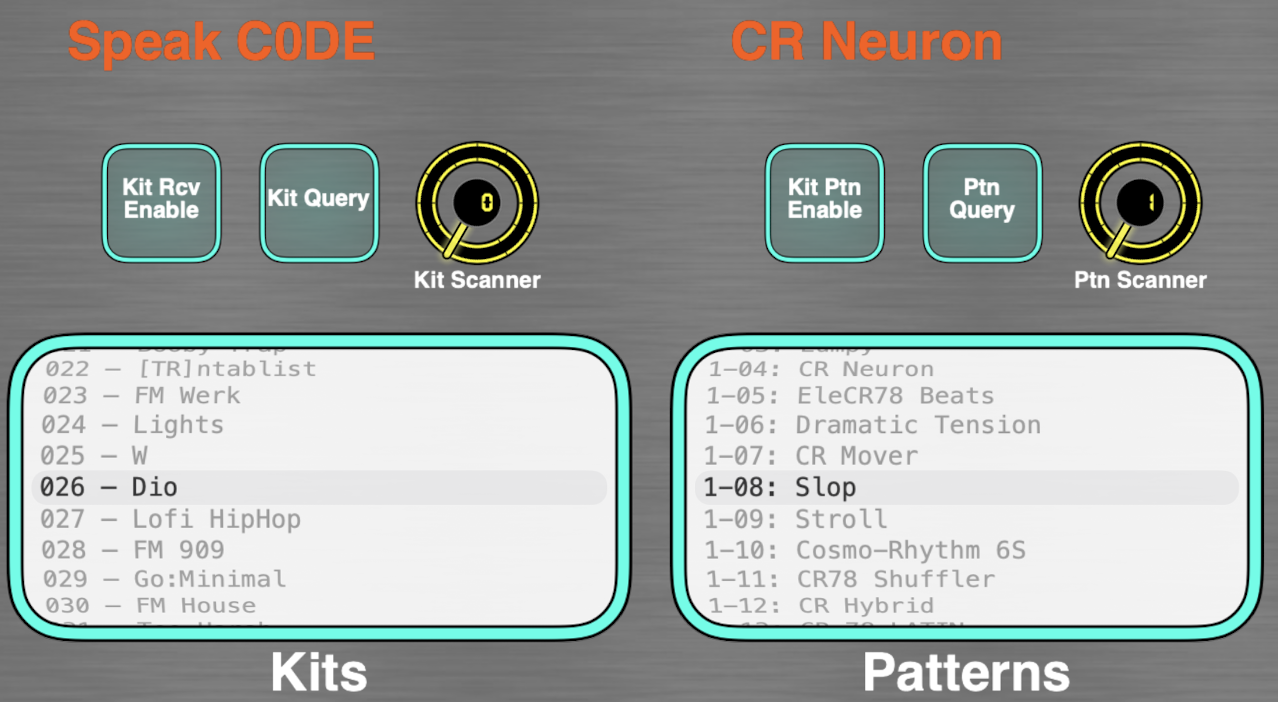
- The “scanner” control contains the SysEx message to command the target device transmit the desired strings. Named Ticks contain the values to “scan” - repeat the first value at the end. (For Kits in this example, these values are 0 .. 127, then 0 is repeated.)
- The query control is a supercontrol of the scanner, with snap to value enabled, causing it to scan across all the scanner values. If some messages get skipped, increase the snap to value time.
The above approach works when patch values are stored in discrete memory locations. Some devices may only have the data accessible in scratchpad memory. In this case, we would build a set of helper controls that successively recall all the patches to scratchpad, read the string, then move to the next patch.
StreamByter could be used to add a synthetic V to the inbound data for storing.
- Use a global variable in outbound StreamByter rule to indicate which patch was recalled
- Inbound - insert the global variable at the end of the message to identify the correct storage location
- Keep the snap to value time slow so messages do not get crossed
Once the data is retrieved, you can copy the data out of the Named Ticks for other uses - create a set list or patch cheat sheet. Use a spreadsheet to separate the text from the MIDI and display values.
Advanced - pre-process the inbound string data with a SteamByter rule to add bank information in place of the numeric label, ex: A-02 or 6-15. See Patterns in above figure.
Using stored names to recall patches
So we have all the patch names in memory, and want to use the names to recall the a specific patch. But the SysEx string data is not the format needed to change the patch - it is the format to change the patch name.
Typically, the solution is to make the control with the patch names a supercontrol of the controls necessary to recall the patch.
- Example 1: Roland TR-6s/8s Kit Names - the V values go from 0-127 for the 128 kits. This is straight forward to hook up to the control to recall a kit, either with a program change or SysEx
- Example 2: Roland TR-6s/8s Pattern Names - the 128 V values go from 20 00 to 2F 70. These do not lend themselves to easily operate a subcontrol. In this case, we can
- Use a 1024 named ticks subcontrol to remap the values (V is increasing by 10h, 16384 / 16 = 1024)
- Remap V to 0-127 in an inbound StreamByter rule
manual/20_md_a_to_z.txt · Last modified: by 127.0.0.1
Except where otherwise noted, content on this wiki is licensed under the following license: CC Attribution-Share Alike 4.0 International
